Converting a screenshot to .prg
in timanthes
Opening and cropping
Open the image, select
the screen area (needs to be 320x200) and select image->Crop to
Selection.

Converting to indexed colour
Go to the colours
window and select ‘Reset to Default Palette’.
This will give you the default c64 palette. (Select either yes or no to
the ‘remap’
question
after that, no remapping will be done because the image is not an
indexed
picture yet anyway)

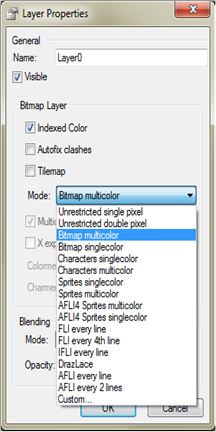
Double click on the
layer. This will bring up the properties for that layer.
Select the ‘Indexed Colour’ checkbox and select the restriction mode
(Bitmap multicolour, in this case).

Your image will now
look like this:

Selecting the background colour
Select
Layer->Machine specific->C64 Pick background colour.

Click on the black
colour and click Ok.

Add a new layer.

Move the layer down
so it becomes the background layer.

Select the paint
bucket tool. Select your background colour in the colour window
(black, in this case) and click on the image to paint the background
layer
black:

Cleaning up
All done. You can select the second layer to
remove bits of
the image that you don’t need,
after which you can export the image as a .prg
file:

